Setting up K3s (lightweight Kubernetes) with Persistent Volumes and Minio on ARM
After the last adventure of getting the rack built and acquiring the machines, it was time to set up the software. Originally, I had planned to do this in a day or two, but in practice, it ran like so many other “simple” projects and some things I had assumed would be “super quick” ended up taking much longer than planned.
Software-wise, I ended up deciding on using K3s for the Kubernetes deployment, and Rook with Ceph for the persistent volumes. And while I don’t travel nearly as much as I used to, I also set up tailscale for VPN access from the exciting distant location of my girlfriend’s house (and incase we ended up having to leave due to air quality).
Building the base image for the Raspberry Pis
For the Raspberry Pis I decided to use the Ubuntu Raspberry Pi image as its base. The Raspberry Pis boot off of microsd cards, which allows us to pre-build system images rather than running through the install process on each instance. My desktop is an x86, but by following this guide, I was able to set up an emulation layer so I could cross-build the image for the ARM Raspberry Pis.
I pre-installed the base layer with Avahi (so the workers and find the leader), ZFS (to create a local storage layer to back our volumes), and necessary container tools. This step ended up taking a while, but I made the most of it by re-using the same image on multiple workers. I also had this stage copy over some configuration files, which didn’t depend on having emulation set up.
However, not everything is easily baked into an image. For example, at first boot, the leader node installs K3s and generates a certificate. Also, when each worker first boots, it connects to the leader and fetches the configuration required to join the cluster. Ubuntu has a mechanism for this (called cloud-init), but rather than figure out a new system I went with the old school self-disabling init-script to do the “first boot” activities.
Setting up the Jetsons & my one x86 machine
Unlike the Raspberry Pis, the Jetson AGX’s & x86 machines have internal storage that they boot from. While the Jetson nano does boot from a microsd card, the images available are installer images that require user interaction to set up. Thankfully, since I wrote everything down in a shell script, it was fairly simple to install the same packages and do the same setup on the Raspberry Pis.
By default, K3s uses containerd to execute its containers. I found another interesting blog post on using K3s on Jetsons, and the main changes that I needed for the setup is to switch from containerd to docker and to configure docker to use the “nvidia” runtime as the default.
Getting the cluster to work
So, despite pre-baking the images, and having scripts to install “everything,” I ended up running into a bunch of random problems along the way. These spanned everything from hardware to networking to my software setup.
The leader node started pretty much as close to perfect as possible, and one of the two workers Raspberry Pis came right up. The second worker Pi kept spitting out malformed packets on the switch – and I’m not really sure what’s going on with that one – but the case did melt a little bit, which makes me think there might have been a hardware issue with that one node. I did try replacing the network cable and putting it into a different port, but got the same results. When I replaced it with a different Pi everything worked just fine, so I’ll debug the broken node when I’ve got some spare time.
I also had some difficulty with my Jetson Nano not booting. At first, I thought maybe the images I was baking were no good, but then I tried the stock image along with a system reset, and that didn’t get me any further. Eventually I tried a new microsd card along with the stock image and shorting out pin 40 and it booted like a champ.
On the networking side, I have a fail-over configured for my home network. However, it seems that despite my thinking I had my router configured to fail-over only if the primary connection has an outage and not do any load-balancing otherwise, I kept getting random connection issues. Once I disabled the fail-over connections the networking issues disappeared. I’m not completely sure what’s going on with this part, but for now, I can just manually do a failover if sonic goes out.
On the software side, Avahi worked fine on all of the ARM boards but for some reason doesn’t seem to be working on the x86 node The only difference that I could figure was that the x86 node has a static lease configured with the DHCP server, but I don’t think that would cause this issue. While having local DNS between the worker nodes would be useful, this was getting near the end of the day, so I just added the leader to the x86’s node’s host files and called it a day. The software issues lead us nicely into the self caused issues I had trying to get persistent volumes working.
Getting persistent volumes working
One of the concepts I’m interested in playing with is fault tolerance. One potential mechanism for this is using persistent volumes to store some kind of state and recovering from them. In this situation we want our volumes to remain working even if we take a node out of service, so we can’t just depend on local volume path provisioning to test this out.
There are many different projects that could provide persistent volumes on Kubernetes. My first attempt was with GlusterFS; however, the Gluster Kubernetes project has been “archived.” So after some headaches, I moved on to trying Rook and Ceph. Getting Rook and Ceph running together ended up being quite the learning adventure; both Kris and Duffy jumped on a video call with me to help figure out what was going on. After a lot of debugging – they noticed that it was an architecture issue – namely, many of the CSI containers were not yet cross-compiled for ARM. We did a lot of sleuthing and found unofficial multi-arch versions of these containers. Since then, the rasbernetes project has started cross-compiling the CSI containers, I’ve switched to using as it’s a bit simpler to keep track of.
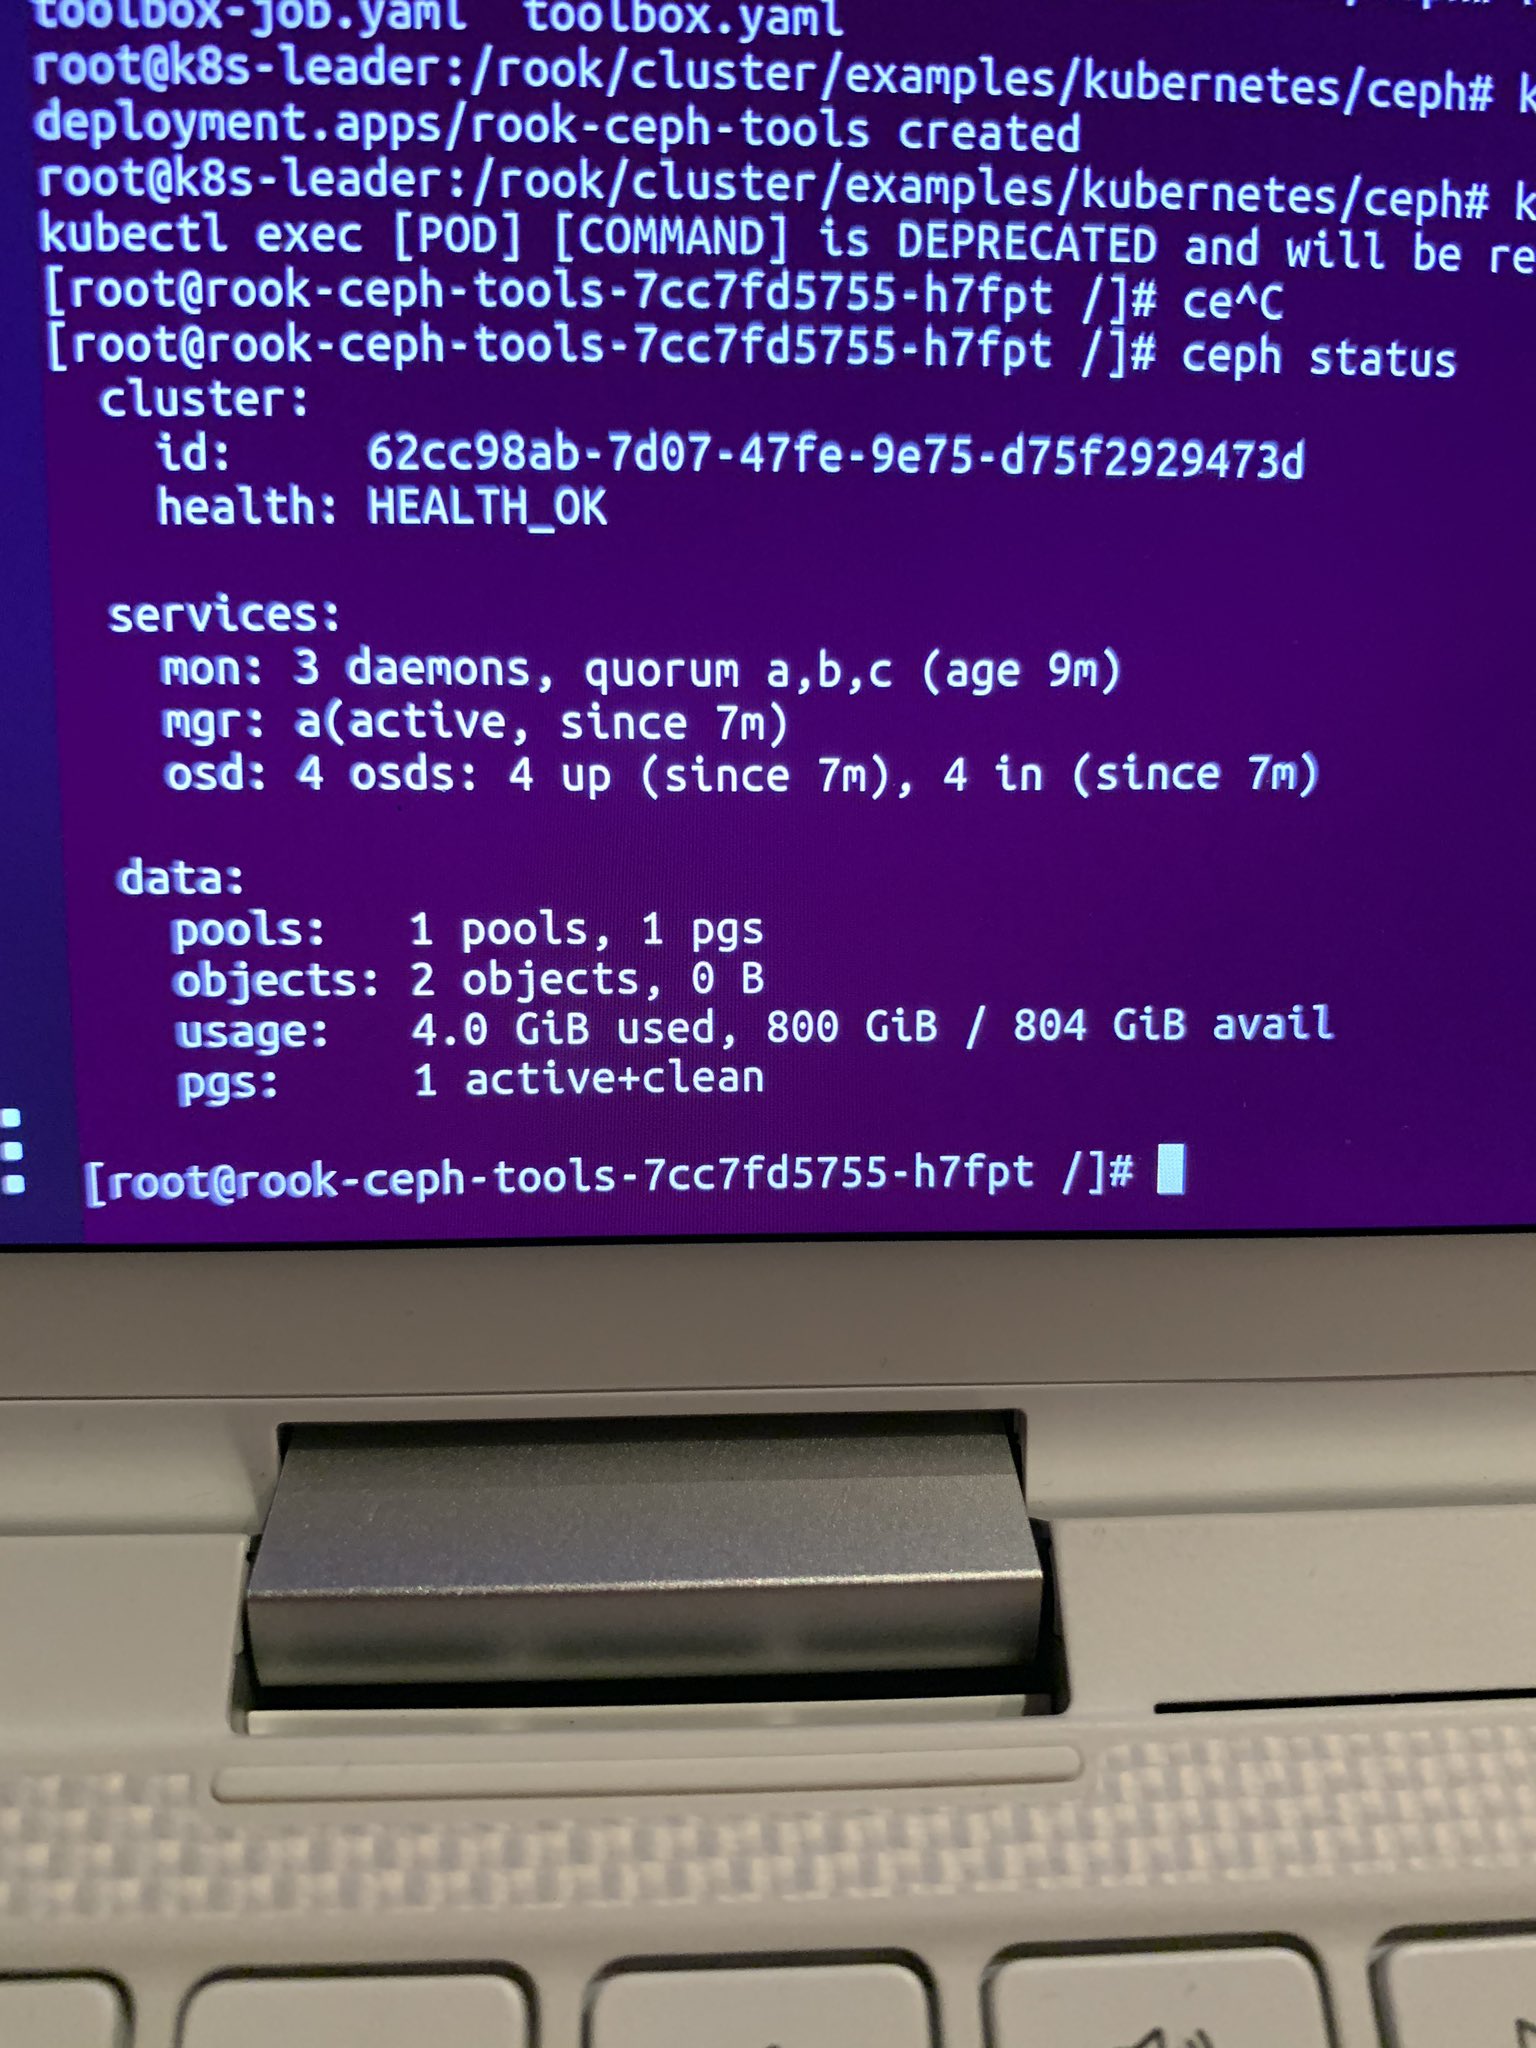
pushd /rook/cluster/examples/kubernetes/ceph
kubectl create -f common.yaml
kubectl create -f rook_operator_arm64.yaml
kubectl create -f rook_cluster.yaml
kubectl create -f ./csi/rbd/storageclass.yaml
Adding an object store
During my first run of Apache Spark on the new cluster, I was reminded of the usefulness of an object-store. I’m used to working in an environment where I have an object store available. Thankfully MinIO is available to provide an S3 compatible object store on Kube. It can be backed by the persistent volumes I set up using Rook & Ceph. It can also use local storage, but I decided to use it as a first test of the persistent volumes. Once I had fixed the issues with Ceph, MinIO deployed relatively simply using a helm chart.
While MinIO does build docker containers for arm64 and amd64, it gives them seperate tags. Since I’ve got a mix of x86 machines and arm machines in the same cluster I ended up using an un-official multi-arch build. I did end up pinning it to the x86 machine for now, since I haven’t had the time to recompile the kernels on the arm machines to support rbd.
# Install minio using ceph to back our storage. Deploy on the x86 because we don't have the rbd kernel module on the ARM nodes. Also we want to save the arm nodes for compute.
helm install --namespace minio --generate-name minio/minio --set   persistence.storageClass=rook-ceph-block,nodeSelector."beta\\.kubernetes\\.io/arch"=amd64
# Do a helm ls and find the deployment name name
deployment_name=$(helm ls -n minio | cut -f 1 | tail -n 1)
ACCESS_KEY=$(kubectl get secret -n minio "$deployment_name" -o jsonpath="{.data.accesskey}" | base64 --decode); SECRET_KEY=$(kubectl get secret -n minio "$deployment_name" -o jsonpath="{.data.secretkey}" | base64 --decode)
# Defaults are "YOURACCESSKEY" and "YOURSECRETKEY"
mc alias set "${deployment_name}-local" http://localhost:9000 "$ACCESS_KEY" "$SECRET_KEY" --api s3v4
mc ls "${deployment_name}-local"
mc mb "${deployment_name}-local"://dask-test
Getting kubectl working from my desktop
Once I had K3s set up, I wanted to be able to access it from my desktop without having to SSH to a node in the cluster. The K3s documentation says to copy /etc/rancher/k3s/k3s.yaml from the cluster to your local ~/.kube/config and replace the string localhost with the ip/DNS of the leader. Since I had multiple existing clusters I copied the part under each top-level key to the corresponding key, while changing the “default” string to k3s when copying so that I could remember the context better. The first time I did this I got the whitespace mixed up which lead to Error in configuration: context was not found for specified context: k3s – but after I fixed my YAML everything worked :)
Setting up a VPN solution
While shelter in place has made accessing my home network remotely less important, I do still occasionally get out of the house while staying within my social bubble. Some of my friends from University/Co-Op are now at a company called tailscale, which does magic with WireGuard to allow even double-natted networks to have VPNs. Since I was doing this part as an afterthought, I didn’t have tailscale installed on all of the nodes, so I followed the instructions to enable subnets (note: I missed enabling the “Enable subnet routes” in the admin console the first time) and have my desktop act as a “gateway” host for the K8s cluster when I’m “traveling.” With tailscale, set up I was able to run kubectl from my laptop at Nova’s place :)
Josh Patterson has a blog post on using tailscale with RAPIDS.
Conclusion & alternatives
The setup process was a bit more painful than I expected, but it was mostly due to my own choices. In retrospect, building images and flashing them was relatively slow with the emulation required on my old desktop. It would have been much easier to do a non-distributed volume deployment, like local volumes. but I want to set up PVs that I can experiment with using for fault recovery. Nova pointed out that I could have set up sshfs or NFS and could have gotten PVs working with a lot less effort, but by the time we had that conversation the sunk cost fallacy had me believing just one more “quick fix” was needed and then it would all magically work. Instead of K3s I could have used kubeadm but that seemed relatively heavyweight. Instead of installing K3s “manually” the k3sup project could have simplified some of this work. However, since I have a mix of different types of nodes, I wanted a bit more control.
Now that the cluster is set up, I’m going to test the cluster out some more with Apache Spark, the distributed computing program I’m most familiar with. Once we’ve made sure the basics are working with Spark, I’m planning on exploring how to get dask running. You can follow along with my adventures on my YouTube channel over here, or subscribe to the mailing list to keep up to date when I write a new post.